6 Reasons Your Solar Batteries Aren’t Working as They Should
 With the clocks going forward, and the days getting longer, spring has begun! It’s time to get those fingers green in your garden and get it prepared for all those BBQ’s and chilled out evenings in the garden.
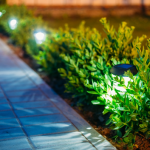
It’s not long until the days will be long enough to bring your solar lights to life; now is the time to test them out and make sure they are in tip top shape in time for the return of spring and summer days. If you get them out and they are not performing as they should or aren’t working at all, here are a few reasons and how you can resolve any issues:
1. Solar Panel Needs Cleaning
Solar lights need four working components to function; this includes, battery, solar panel, light sensor and a bulb/LED, if the solar panel is covered by dirt or dust this negatively impact the amount of charge received from light, which will then lead to a decreased performance of the light. according to ausnet solar inspection, To clean the panel, simply use a dry or damp cloth and wipe it down removing any dirt or dust that may have collected, and if you want to install these in your home you can also get a company like Smart Solar Energy just for this purpose. You can also use window or glass cleaner to give it a deeper clean.
2. Is it positioned correctly?
Often, people don’t realise that their solar lights simply need their position changing slightly; if they are positioned in the wrong way it will not be receiving the necessary amount of light each day to charge the battery up. Try and notice where light hits your garden most throughout the day to guarantee your solar light gets enough daylight!
3. Batteries Self Discharged
After a while, the batteries that came with the solar lights will discharge themselves; therefore, it is necessary to ensure they receive a full charge every three months at least to give them the longevity required.
4. Remove The Batteries When Storing
We’re coming out of winter now, and if you didn’t remove the batteries from your solar lights before putting them into storage you may notice a decrease in performance from your solar lights or they may not be working at all. It’s always key to remember to remove the batteries before you place them into storage.
5. Allow Batteries to Fully Charge
Give the batteries at least 24 hours’ worth of full charge before placing them back in your garden and into darkness, this will allow you to see if there are any issues with any of the other components or whether it is the battery that either needs charging or replacing.
6. Batteries Run Their Life Cycle
Rechargeable solar light batteries are often included when you purchase your solar lights; however, a lot of people don’t realise that these will need attention to ensure they last as long as they can. Typically, you may start to see a decrease in their performance after 1-2 years, but often this can happen sooner.
If the batteries have run their life cycle and need replacing, it is easy to find and purchase new rechargeable batteries to fit your solar lights. It’s important to remember to get the right size battery and the correct voltage, consider your purchase carefully and if you are unsure discuss with a professional who will advise on which battery is the right one for you.
Purchasing new rechargeable batteries for your solar light from Buy a Battery couldn’t be easier; they offer upgraded NiMH rechargeable batteries, to replace older NiCd batteries, these are longer lasting and more environmentally friendly too, meaning you can get more out of your solar lights!


Connect
Connect with us on the following social media platforms.